The day we moved into our apartment, we were shocked by how small it actually was. This can’t be it, we thought; it didn’t look this tiny when we visited a few months ago. But we made do and have actually come to like it. Or maybe it’s the in-unit washer/dryer that makes us think that way.
For months, I was on the hunt for a coffee table that would be a better fit in our tiny living room. My list of must have’s for the new table were: round shape, smaller & shorter than the mammoth current table, and made of high-quality, sturdy wood. And now, I am happy to say I have found a table that hit everything on my checklist!

This bad boy was bought on etsy and the seller even delivered it to our apartment for free. As you can see, it is painted and distressed in a grey color- cute but not really our style. I knew immediately I wanted to strip the paint and re-stain in a dark espresso color. And that is what we did!
Supplies:
Citristrip Stripping Gel
Old paintbrush
Garbage bags
Mr. Clean Multi Surfaces Cleaner
Sponge
Palm sander with 120 grit paper
Lint free cloth
Minwax Wood Finish in Ebony
Minwax Wipe on Poly
Steel wool
Tack Cloth
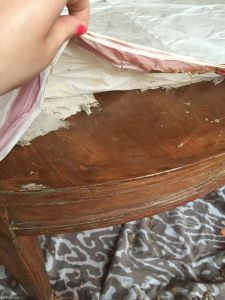
I evenly applied a thick coat of Citristrip with an old paintbrush over the entire table. I then placed garbage bags directly to the top, sides and legs. (The Citristrip should still be wet). Pat down and make sure it’s “stuck” to the sides. After a few hours, I checked to see what was happening under the bag and began scraping the gunky Citristrip/paint with a spackle knife. The paint came off extremely easy. Seriously, I was going over it with only one scrape and the paint was practically just sliding off.
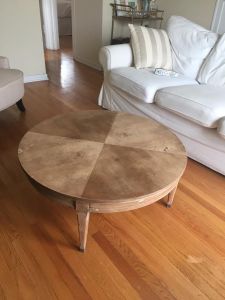
Lookin good! Once the paint was completely removed, I filled a bucket of warm water with Mr. Clean Multi Surfaces Cleaner (safe to use on wood) and sponge cleaned any left over grime.
Wait 24 hours to dry.
After the table is completely dry, sand down the wood to create a nice even surface before staining. I used 120 grit sandpaper (a medium grit) to smooth out the surface, sides and legs. Be sure to sand with the grain of the wood!
Then, I wiped down the table with Mr. Clean again to get rid of any dust and dirt.

Once the table is dry, it’s time to stain. I put on some rubber gloves and got to work.
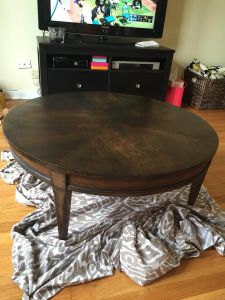
I went with the color “ebony” because I wanted a rich, dark, almost black color for the table. I used a clean paintbrush to wipe a thin layer of stain on to the wood, going with the grain. You could tell the table was thirsty because it happily soaked up the first coat of stain.
After about 10 minutes, I used a dry cloth to wipe up any excess stain. Make sure you don’t press down too hard when you wipe, but definitely wipe up any extra stain that is on the surface.
I then waited 24 hours and checked on the table again. The color wasn’t quite dark enough for me, so I decided to go for another coat of stain. I repeated the staining process, this time leaving the stain on for 20 minutes to soak in before wiping it up.

To seal and protect the stained wood, I used a wipe-on poly. I literally just poured it directly onto the coffee table and wiped an even coat with a soft, lint free cloth. After it dried (about 3-4 hours), I used steel wool to lightly buff out the wood, and a tack cloth to wipe up any dust. I repeated this process 2 more times, for a total of 3 coats of wipe-on poly.
 I’m in love with our little round table!